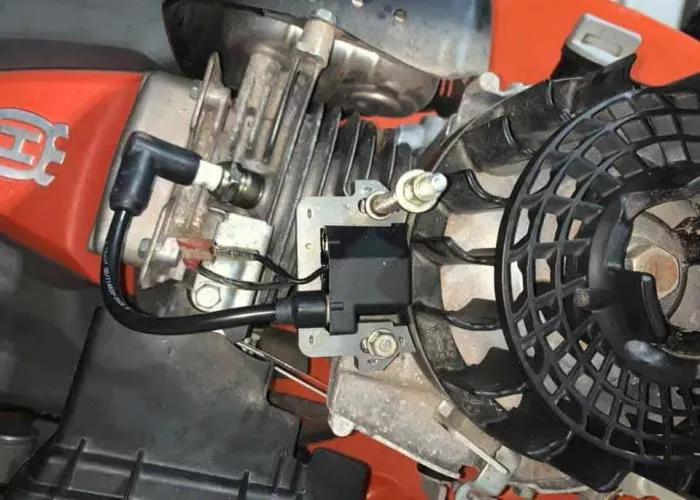
A lawn mower’s ignition coil is a critical component that ensures the engine starts and runs smoothly. When it fails, the mower may not start, sputter, or stall unexpectedly. Understanding how to diagnose and fix the ignition coil can save time and money while avoiding unnecessary repairs. This guide provides a step-by-step approach to troubleshooting and repairing the ignition coil on a lawn mower, covering everything from basic testing to proper replacement techniques.
Understanding the Ignition Coil
The ignition coil is responsible for generating the high voltage needed to create a spark at the spark plug. Without this spark, the engine cannot ignite the fuel-air mixture, preventing the mower from starting. A faulty ignition coil can result in weak or no spark, leading to poor engine performance or failure to start.
Key Functions of the Ignition Coil
The ignition coil transforms the low voltage from the battery into a high-voltage current. This current travels through the spark plug wire and creates a spark at the spark plug gap. If the coil is damaged, the spark may be weak or absent, causing engine misfires or no start conditions.
Common Symptoms of a Bad Ignition Coil
- The lawn mower fails to start
- The engine starts but runs unevenly or stalls
- The spark plug shows no spark when tested
- The mower backfires or has poor acceleration
Tools and Safety Precautions
Before working on the ignition coil, gather the necessary tools and follow safety precautions to avoid injury or further damage.
Required Tools
- Socket wrench set
- Screwdrivers
- Multimeter for electrical testing
- Spark tester
- Clean cloth and degreaser
Safety Measures
- Disconnect the spark plug wire to prevent accidental starts
- Work in a well-ventilated area to avoid inhaling fumes
- Wear gloves and safety glasses for protection
- Ensure the mower is on a flat, stable surface
Step-by-Step Guide to Diagnosing the Ignition Coil
Before replacing the ignition coil, confirm that it is the source of the problem. Follow these steps to test the ignition coil.
Step One: Inspect the Spark Plug
Remove the spark plug and check its condition. A fouled or damaged spark plug can mimic ignition coil failure. Clean or replace the spark plug if necessary.
Step Two: Test for Spark
Reconnect the spark plug wire and use a spark tester. Pull the starter cord or engage the electric start. If there is no spark, the ignition coil may be faulty.
Step Three: Check the Ignition Coil Resistance
Use a multimeter to measure the resistance of the ignition coil. Refer to the mower’s service manual for the correct resistance values. If the readings are outside the specified range, the coil is defective.
How to Replace the Ignition Coil
If testing confirms a faulty ignition coil, follow these steps to replace it.
Step One: Disconnect the Battery
For electric-start mowers, disconnect the battery to prevent electrical hazards.
Step Two: Remove the Old Ignition Coil
Locate the ignition coil near the flywheel. Remove the mounting bolts and disconnect any wiring. Carefully lift the coil away from the engine.
Step Three: Install the New Ignition Coil
Position the new coil in place and secure it with the mounting bolts. Reconnect any wiring and ensure proper alignment with the flywheel.
Step Four: Adjust the Air Gap
The gap between the ignition coil and the flywheel must be set correctly. Use a feeler gauge to adjust the gap to the manufacturer’s specifications.
Step Five: Reassemble and Test
Reconnect the spark plug wire and battery. Start the mower to verify that the new ignition coil resolves the issue.
Troubleshooting Common Issues After Replacement
Sometimes, even after replacing the ignition coil, problems may persist. Here are some potential issues and solutions.
No Spark After Replacement
- Check the spark plug wire for damage
- Ensure the coil is properly grounded
- Verify the kill switch is not engaged
Weak or Intermittent Spark
- Inspect the flywheel for damage or debris
- Confirm the air gap is set correctly
- Test the battery or charging system for proper voltage
Preventive Maintenance for the Ignition System
Regular maintenance can extend the life of the ignition coil and prevent future issues.
Keep the Mower Clean: Dirt and debris can cause overheating and electrical shorts. Clean the engine area regularly.
Inspect Wiring and Connections: Loose or corroded wires can disrupt the electrical flow. Check connections and replace damaged wires.
Use Quality Replacement Parts: Always use OEM or high-quality aftermarket ignition coils to ensure reliability.
When to Seek Professional Help
If troubleshooting and replacement do not resolve the issue, the problem may be more complex. Consider consulting a professional if:
- The engine still does not start
- There are signs of deeper electrical problems
- You are unsure about any step in the process
Conclusion
Fixing the ignition coil on a lawn mower is a manageable task with the right tools and knowledge. By following this guide, you can diagnose, replace, and maintain the ignition coil to keep your mower running smoothly. Regular inspections and proper care will help prevent future ignition-related problems.
This comprehensive guide ensures that even beginners can confidently address ignition coil issues. With patience and attention to detail, you can restore your lawn mower’s performance and avoid costly repairs.
Related topics:
- WHY DOES MY LAWN MOWER START THEN STOP?
- WHAT IS AN ELECTRIC START LAWN MOWER?
- HOW TO START CRAFTSMAN PLATINUM 7.00 LAWN MOWER?

